Monday, May 3, 2010

Increase bittorent download Speed


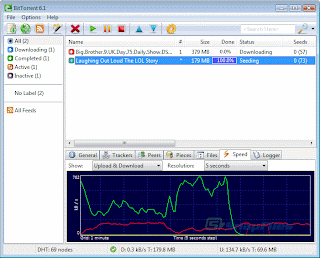
The latest file sharing protocol bittorrent has modified everything when it comes to file sharing. It is a nice platform for downloading large files. Sharing of files include movies, iso images and MP3 songs. Bittorent is mainly famous for illegal file sharing .
The Bittorrent system can be slow at times due to heavy traffic. so let us tweak bittorrent sharing program a little bit.
There are a lot of different bittorrent clients that you can download. I think the best are BitCommet and uTorrent.

Here is a few tips to speed up uTorrent Client. Similar can be implemented on any other torrent clients ,which you are using.

Step 1: Increase TCP connections

You need to increase the number of TCP connections that are allowed at max.Windows XP Service Pack 2 came with the number of allowed open connections to 10. This is to stop any piece of spyware(in our case bittorent client even) from totally taking over your internet connection. TCP connection allowed should be 50 for optimal performance. The best way to increase the maximum number of connections is to apply patch that is available at www.lvllord.de. A nice way to fix this is to download this patch .

The little tweak to the torrent client works great in certain times. If you’re using uTorrent go to Options menu then Preferences. In the Preferences go the Advanced Options. In the advanced options change the net.max_halfopen connections to 80. In the same section change the max half open tcp connections to 80. Once your done click on OK and you are all set. This tweak will let the maximum TCP connection available for the bittorrent client. Now start downloading you’ll realize a little difference in the download speed. Port forwarding technique is more effective than this.

A third point of interest is that some “windows updates” revert your tweaked tcp connections back to 10. So it’s wise to check this every now and then. You can check this by going to (in windows xp) Start > Control Panel > Administrative Tools > Event Viewer > System… Look for event 4226 (sort by event).
If there are a lot of daily occurrences it’s likely that the max amount of half-open tcp connections was set back to 10. Or you’re infected with some nasty spy ware…

Step 2:Torrent Client Configuration
In order to apply these tips you must know your maximum up- and download speed. You can test your bandwidth over here (stop all download activity while testing).

Settings 1-4 can be found in the options, settings or preference tab of most torrent clients.

1. Maximum upload speed

Probably the most important setting there is. Your connection is (sort of) like a pipeline, if you use you maximum upload speed there’s not enough space left for the files you are downloading. So you have to cap your upload speed.

Use the following formula to determine your optimal upload speed…

80% of your maximum upload speed

so if your maximum upload speed is 40 kB/s, the optimal upload rate is 32kB/s But keep seeding!

Delete or Remove Recycle bin Icon from Desktop


If you are the kind of person who always likes neatness specially desktop, then here is a small trick for you that will simply remove the Recycle bin icon from desktop.


Follow the steps below:

[Start] [Run] [Regedit]
Registry Key: HKEY_LOCAL_MACHINE\SOFTWARE\Microsoft\Windows\

CurrentVersion\Explorer\BitBucket


Modify/Create the Value Data Type(s) and Value Name(s) as detailed below.


Data Type: DWORD // Value Name: NukeOnDelete


Setting for Value Data: [0 = Use Recycle Bin / 1 = Permanently Delete]
Exit Registry and Reboot


Another Method
start->run->gpedit.msc-> user configuration ->desktop->remove recycle bin from desktop->double click->change it not configured to enable->apply and ok.

now come to start->run->gpupdate.exe and press enter.

your recycle bin icon is gone from desktop nad you will need to revert your settings for get that back.

after reverting setting make sure to run gpupdate.exe command.

How to hack Rapid share and Mega upload


Hi all, This is for those who have to wait for about an hour after downloading certain amount of stuff from rapid share. To overcome this time constraint follow these steps:
RAPID SHARE
Method 1
1.open your rapid share link
2.then click on free.
3.As soon as timer start type this in address bar and click enter
javascript:alert(c=0)
4.a pop up message will come click ok your counter is zero just download the stuff


Method 2
1.Delete the cookies in your browser internet explorer or Firefox or opera or whatever u use).
2.Press start->run,type cmd.
3.In the command prompt,type ipconfig/flushdns press enter.Then type ipconfig/release,then ipconfig/renew .Now type exit.
4.Now try downloading, for many people this may work if their ISP provides a dynamic ip

Method 3
1.Just switch off your router or modem) and switch it back on.
2.This may work for some users Mtnl and Bsnl) and maybe some others too.

Actually these methods generally work for those people whose ISP gives them dynamic ip.
If these don't work then one more thing that can be done is to use proxies.
Method 4
1.Download the software Hide ip platinum.

2.Run it, then it will automatically chose a proxy (ip of a different country) for you. So you can easily download without any restrictions. You just have to change the proxy each time you download.

MEGA UPLOAD


Mega upload is very easy to hack to solve the download slots problem). Just go to http://leech.megaleecher.net/
Here you will find a place to put your original link. Put it there press enter and then you will get a direct link within some seconds. You are done!!!!!

Improve Windows XP Shutdown Speed


This tweak reduces the time XP waits before automatically closing any running programs when you give it the command to shutdown.


Go to Start then select Run
Type 'Regedit' and click ok
Find 'HKEY_CURRENT_USER\Control Panel\Desktop\'
Select 'WaitToKillAppTimeout'
Right click and select 'Modify'
Change the value to '1000'
Click 'OK'
Now select 'HungAppTimeout'
Right click and select 'Modify'
Change the value to '1000'
Click 'OK'

Now find 'HKEY_USERS\.DEFAULT\Control Panel\Desktop'
Select 'WaitToKillAppTimeout'
Right click and select 'Modify'
Change the value to '1000'
Click 'OK'
Now find 'HKEY_LOCAL_MACHINE\System\CurrentControlSet\Control\'
Select 'WaitToKillServiceTimeout'
Right click and select 'Modify'
Change the value to '1000'
Click 'OK'

How to Block Unwanted Emails

Do you want to block emails from your ex wife/husband? Do you want to block those annoying offers and newsletters that reach your inbox? Well here is a way to block all those unwanted and annoying emails that you do not want to see or read! With this trick you can block individual email address or the whole domain from which you do not want the emails to come from. Here are the step-by-step instructions to do this.

For Gmail

1. Login to your account

2. At the top-right corner, click on Settings

3. Under Settings, click on Filters

4. You’ll now see an option “Create a new filter“, click on it

5. Now in the From field enter the email address from which you do not want to receive the emails

For ex. you may enter john@gmail .com in the From field to block all incoming emails from this address. However if you want to block the whole domain then use the following syntax: *@xyz.com. Now all the incoming emails from the domain xyz.com will be blocked.

6. Click on Next Step, select the action you’d like to take on the blocked emails. You may select the option Delete it so that the blocked email is moved to trash. To unblock the email, all you need to do is just delete the filter that you’ve created.

For Yahoo

1. Login to your account

2. At the top-right corner, click on Options

3. A drop down menu appears, now click on More options

4. In the left panel select the option Filters and click on create or edit filters

5. Now click on Add

6. In the next screen, give a name to your filter and in the From header field enter the email address that you want to block.

Fox ex. john@gmail.com or if you want to block an entire domain then just enter @xyz.com. Dont enter *@xyz.com. Select the option Move the message to: Trash and click on Save Changes.

For Hotmail

1. Login to your account

2. At the top-right corner, click on Options

3. A drop down menu appears, now click on More options

4. Click on Safe and blocked senders link under Junk e-mail

5. Now click on Blocked senders

6. Type in the email address that you want to block under blocked e-mail address or domain field.

For ex. Enter john@yahoo.com to block the individual email address or just enter xyz.com to block the entire domain.

That’s it. You no longer receive those annoying emails in your inbox. Keep your inbox clean and tidy. I hope this post helps.
free counters